
In this post, I will demonstrate how to create a custom Wazuh decoder for Postfix running inside a Docker container and how to configure Wazuh to block SASL brute-force attempts.
Introduction
Wazuh is a powerful security monitoring platform that provides real-time threat detection, active response, and log analysis. Custom decoders in Wazuh allow you to parse and interpret specific log formats, enabling precise detection and response capabilities.
In this guide, we will focus on creating a custom decoder for Postfix logs, specifically for detecting failed SASL login attempts, and configuring Wazuh to block these brute-force attempts automatically.
Create a Custom Decoder
Custom decoders in Wazuh allow you to define how specific log entries should be parsed and interpreted. For this example, we will create a decoder for Postfix logs generated by failed SASL login attempts.
Sample Log Entry
Here is an example of a Docker log entry for a failed SASL login:
Mar 13 12:22:12 1cdb02a6a6ad postfix/smtps/smtpd[2124]: warning: unknown[122.111.10.9]: SASL LOGIN authentication failed: UGFzc3dvcmQ6, sasl_username=user123
Parsing Logs Using Regex
To create a custom decoder, we first need to define a regular expression (regex) to capture the relevant parts of the log entry. Here is the regex pattern we will use:
warning: \S+\[(\S+)\]: (SASL LOGIN) (authentication failed): \S+, sasl_username=(\S+)
Testing the pattern on Regex101 shows that it is working: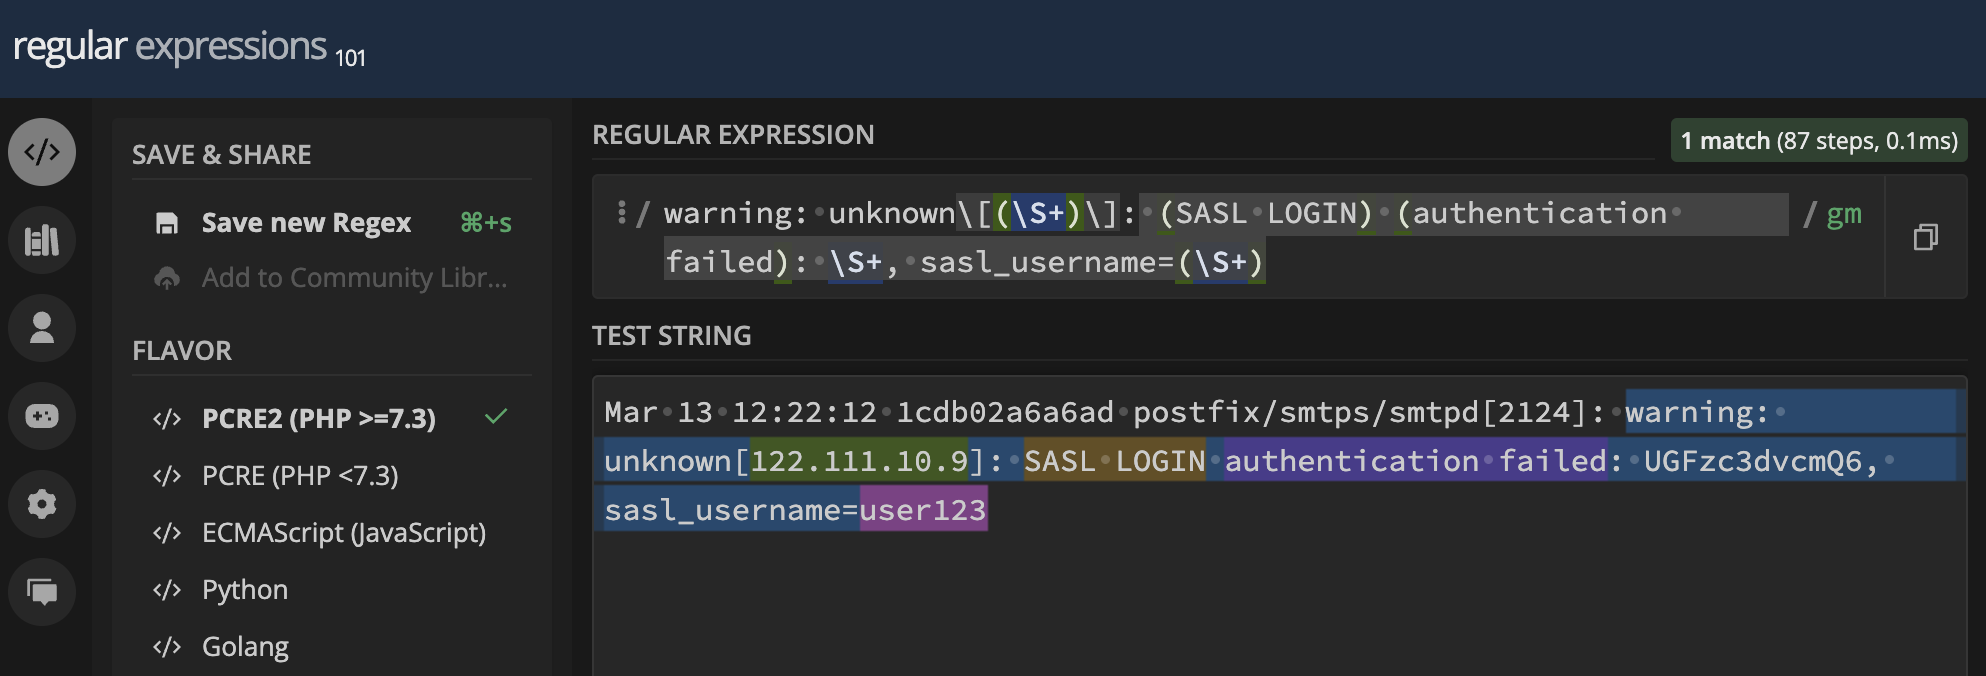
This pattern captures the source IP address, action, status, and username from the log entry.
Configuring the Decoder in Wazuh
Local decoders can be configured in the file /var/ossec/etc/decoders/local_decoder.xml. If you have multiple, or more complex decoders, you can create individual files in the /var/ossec/ruleset/decoders directory. Default decoders are stored in the /var/ossec/ruleset/decoders directory.
Here is the XML configuration for our custom decoder:
<!--
Mar 13 12:22:12 1cdb02a6a6ad postfix/smtps/smtpd[2124]: warning: unknown[122.111.10.9]: SASL LOGIN authentication failed: UGFzc3dvcmQ6, sasl_username=user123
-->
<decoder name="postfix-sasl-auth">
  <parent>docker</parent>
  <regex>warning: \S+\[(\S+)\]: (SASL LOGIN) (authentication failed): \S+, sasl_username=(\S+)</regex>
  <order>srcip, action, status, dtsuser</order>
</decoder>
This configuration defines a decoder named “postfix-sasl-auth” with a regex pattern to parse the log entries. It is a good practice to have one or more sample log lines as a comment above the decoder for future reference.
Testing the Decoder
After configuring the decoder, restart the Wazuh manager to apply the changes:
systemctl restart wazuh-manager
To test the decoder, you can use Wazuh’s integrated ruleset test feature. This will allow you to verify that the decoder correctly interprets the log entries.
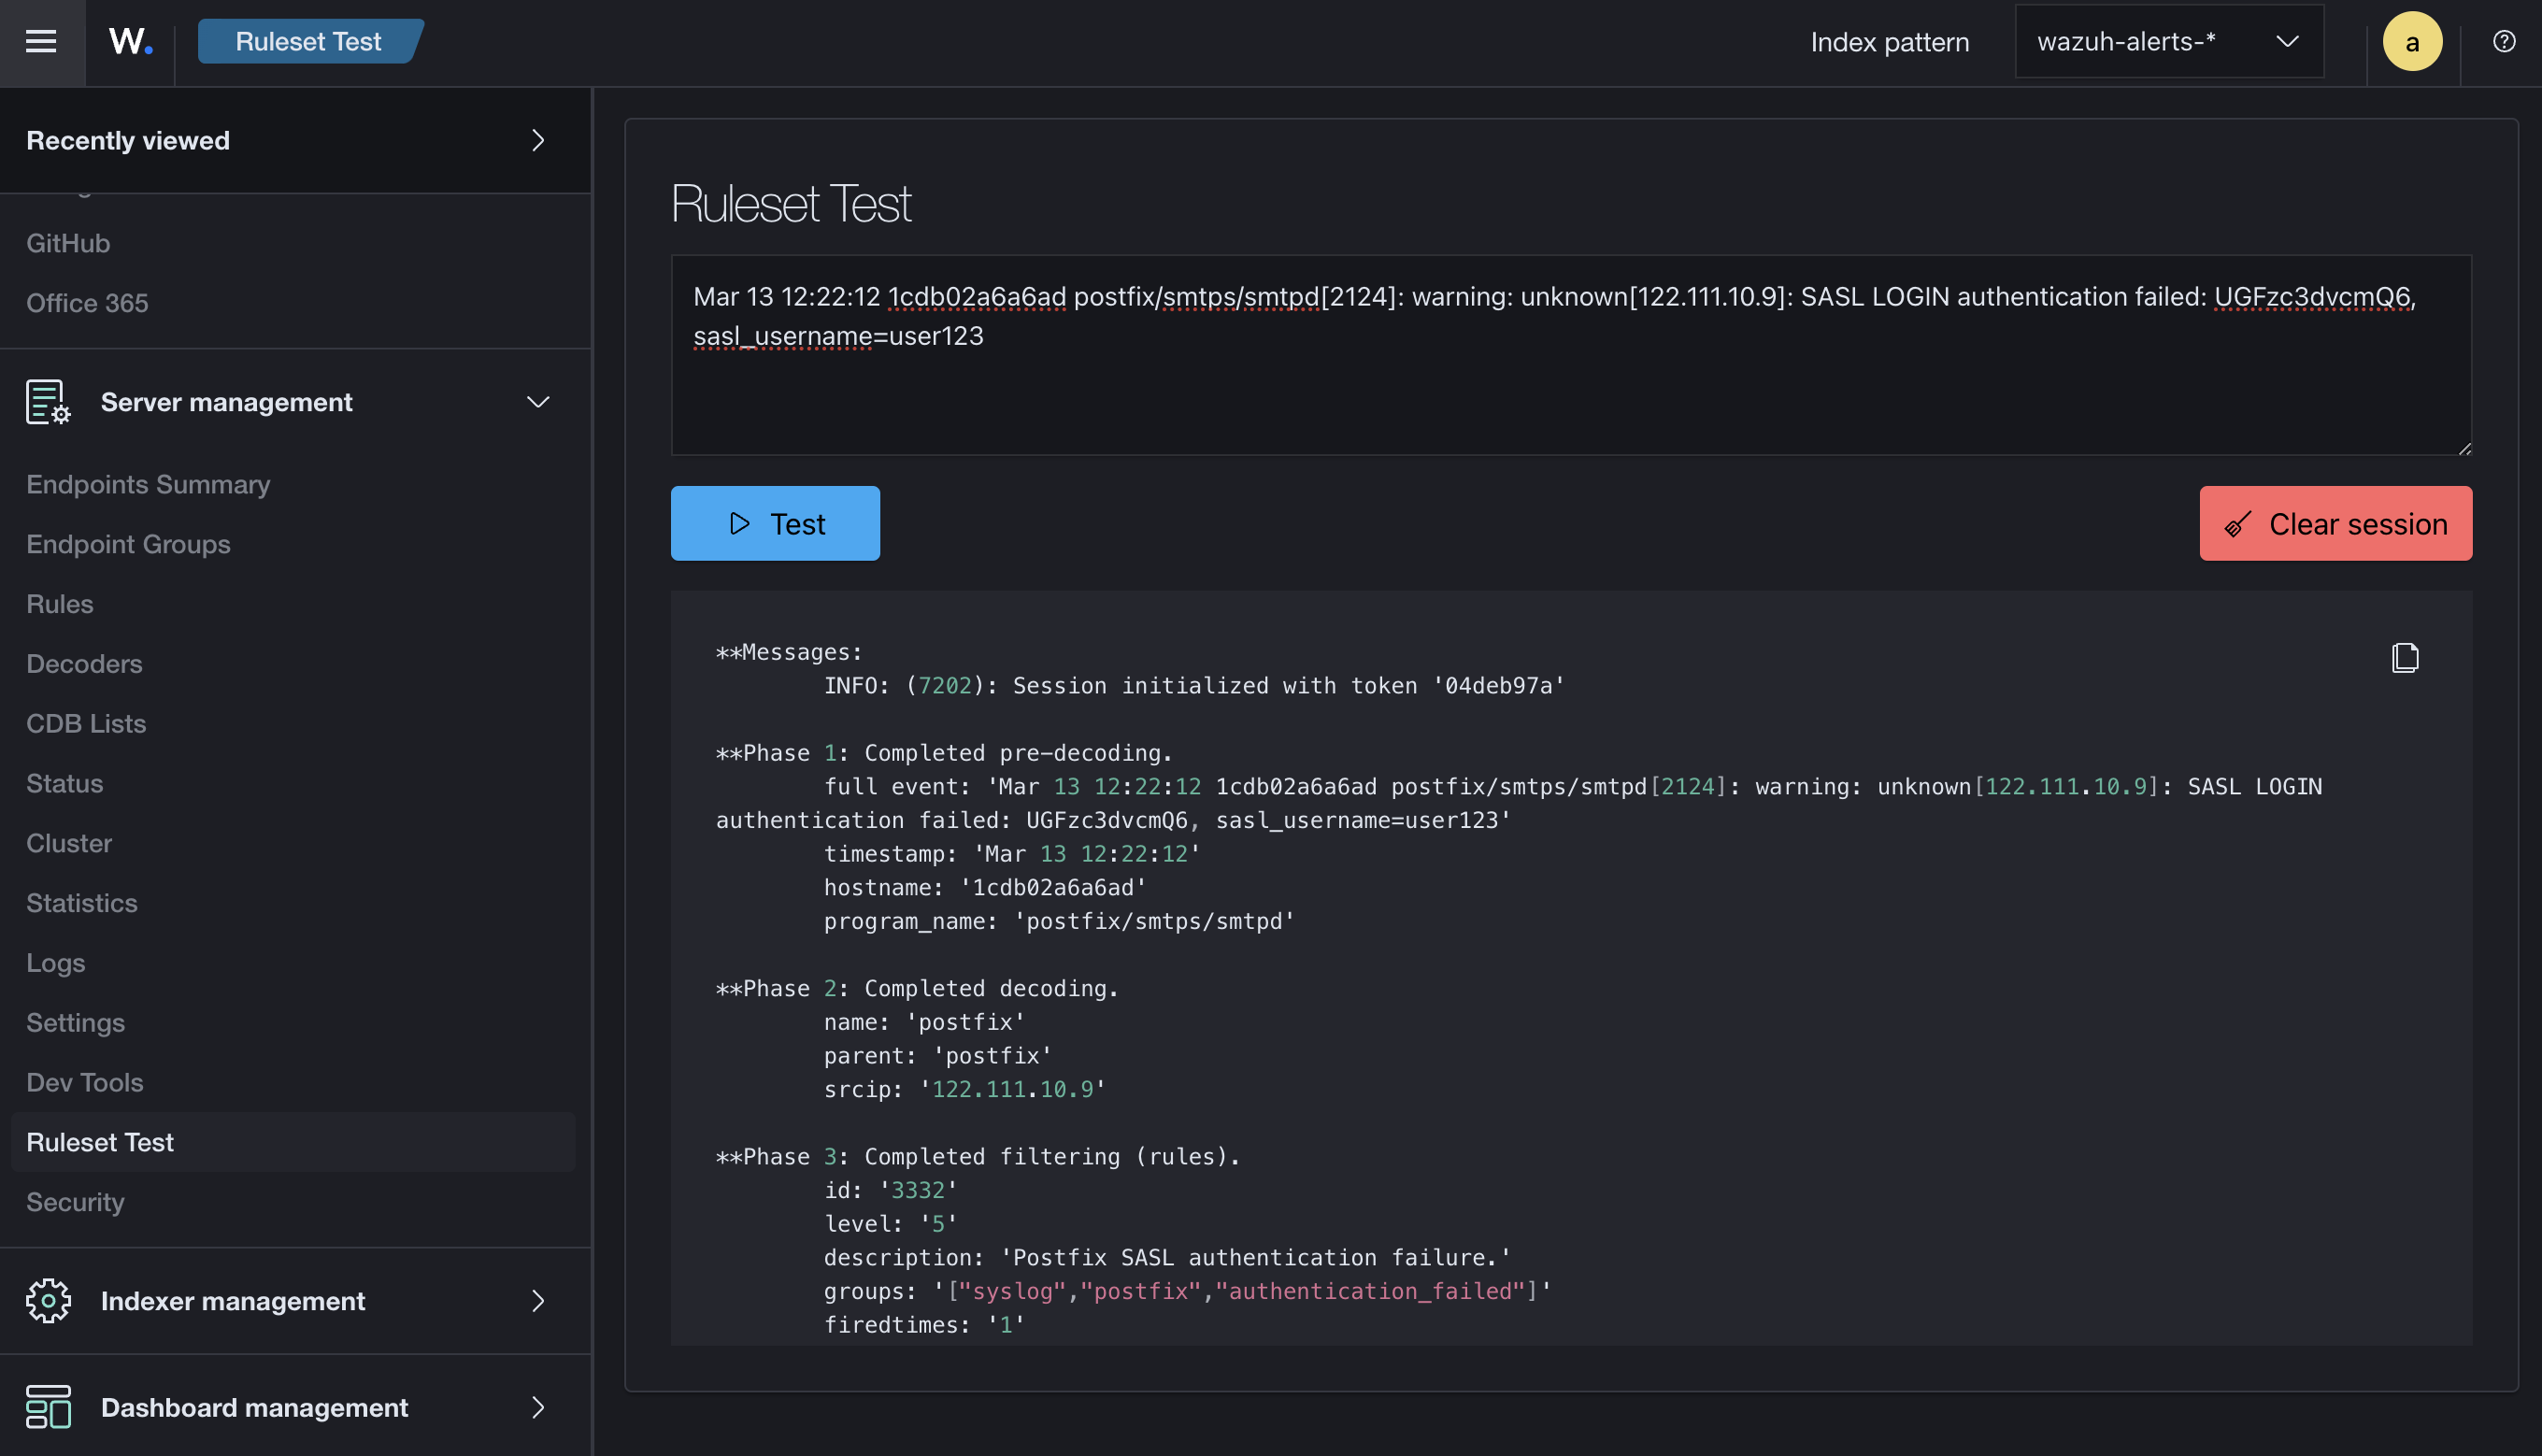
As shown in the screenshot above, the decoder works as intended, correctly parsing the log entries.
Block Brute-Force Attempts
Once we have the custom decoder in place, we can create a rule to detect brute-force attempts and configure an active response to block the offending IP addresses.
Creating a Detection Rule
We need to create a rule to detect failed SASL login attempts. Here is an example rule configuration:
<group name="syslog,postfix,">
  <!--
  2024-03-13T16:26:59+01:00 host c4aff15a8b5c[2998056] Mar 17 16:26:59 c4aff15a8b5c postfix/submission/smtpd[59858]: warning: unknown[101.78.21.175]:>
  -->
  <rule id="100002" level="5" level="7" frequency="5" timeframe="86400">
    <if_sid>86000</if_sid>
    <decoded_as>docker</decoded_as>
    <action>SASL LOGIN</action>
    <status>authentication failed</status>
    <description>postfix: SASL authentication failed</description>
    <group>authentication_failed,docker,</group>
  </rule>
</group>
This rule matches log entries decoded as “docker” with an action of “SASL LOGIN” and a status of “authentication failed” and triggers, when the event occurs for at least 5 times.
Creating a Command
Next, we need to create a command to drop traffic from the offending IP address. Add the following command to your local_rules.xml file:
<command>
  <name>firewall-drop</name>
  <executable>firewall-drop</executable>
  <timeout_allowed>yes</timeout_allowed>
</command>
Configuring an Active Response
Now, we configure an active response to trigger the firewall drop command when our rule matches:
<active-response>
  <disabled>no</disabled>
  <command>firewall-drop</command>
  <location>defined-agent</location>
  <agent_id>002</agent_id>
  <rules_id>100002</rules_id>
  <timeout>338400</timeout>
</active-response>
This configuration will execute the firewall drop command, blocking the offending IP address for four days.
Restarting Services
Finally, restart both the manager and the agent to apply these changes:
systemctl restart wazuh-manager
systemctl restart wazuh-agent
By following these steps, you will have successfully created a custom Wazuh decoder for Postfix running in a Docker container and configured an automated response to block brute-force attempts. This setup enhances your security posture by providing real-time detection and mitigation of suspicious activities.